Running a Jupyter notebook from a remote server
Update: Read my review of the Jupyter Notebook ecosystem in 2020 in this link
In my research, I usually work with remote servers to run deep learning models inside machines more powerful than my laptop. In some cases, I find myself needing to fire up a Jupyter notebook to draw quick-and-easy visualizations and short analyses. Here, I’ll show you how to run a Jupyter notebook from a remote server.
The main idea is that you will run a “headless” notebook from your server, but have the graphical interface (GUI) show up in your local machine’s web browser. The libraries, hardware, and all backend-related stuff depends on your remote machine, but the GUI is seen from your laptop.
Set-up: Here, let’s define the local user and host as localuser and localhost
respectively. Similarly, let’s define the remote user and remote host as
remoteuser and remotehost. Needless to say, make sure that Jupyter notebook
and all its dependencies
are installed in both machines. Here’s a quick diagram of the whole process, I
will discuss them one-by-one in the next section:
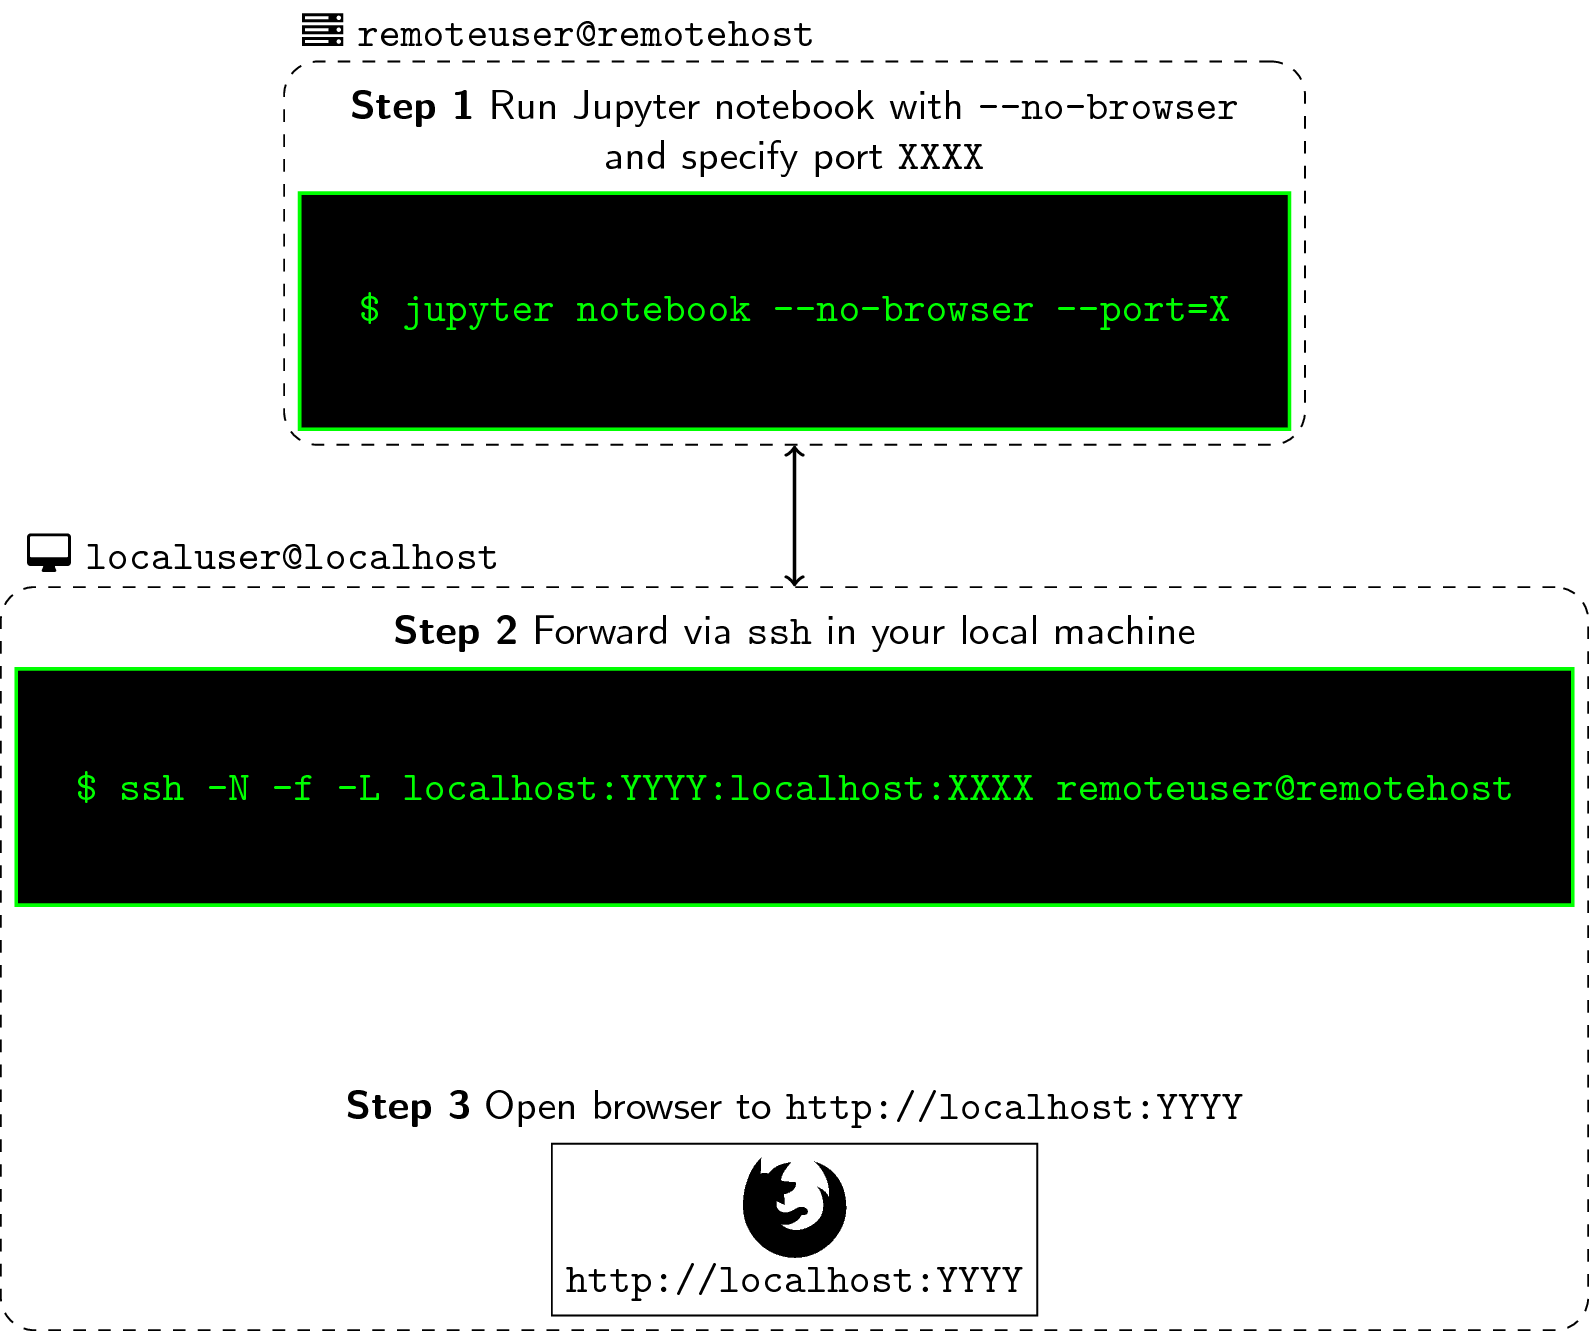
Figure: A simple three-step process for running a remote Jupyter notebook.
Step 1: Run Jupyter Notebook from remote machine
Log-in to your remote machine the usual way you do. In most cases, this is simply
done via an ssh command. Once the console shows, type the following:
remoteuser@remotehost: jupyter notebook --no-browser --port=XXXX

# Note: Change XXXX to the port of your choice. Usually, the default is 8888.
# You can try 8889 or 8890 as well.
jupyter notebook: simply fires up your notebook--no-browser: this starts the notebook without opening a browser--port=XXXX: this sets the port for starting your notebook where the default is8888. When it’s occupied, it finds the next available port.
Step 2: Forward port XXXX to YYYY and listen to it
In your remote, the notebook is now running at the port XXXX that you
specified. What you’ll do next is forward this to port YYYY of your
machine so that you can listen and run it from your browser. To achieve
this, we write the following command:
localuser@localhost: ssh -N -f -L localhost:YYYY:localhost:XXXX remoteuser@remotehost
ssh: your handy ssh command. See man page for more info-N: suppresses the execution of a remote command. Pretty much used in port forwarding.-f: this requests thesshcommand to go to background before execution.-L: this argument requires an input in the form oflocal_socket:remote_socket. Here, we’re specifying our port asYYYYwhich will be binded to the portXXXXfrom your remote connection.
Step 3: Fire-up Jupyter Notebook
To open up the Jupyter notebook from your remote machine, simply start your browser and type the following in your address bar:
localhost:YYYY
Again, the reason why we’re opening it at YYYY and not at XXXX is because
the latter is already being forwarded to the former. XXXX and YYYY can be
the “same” number (not the same port, technically) because they are from
different machines.
If you’re successful, you should see the typical Jupyter Notebook home screen in the directory where you ran the command in Step 1. At the same time, if you look in your remote terminal, you should see some log actions happening as you perform some tasks.
In your first connection, you may be prompted to enter an Access Token as typical to most Jupyter notebooks. Normally, I’d just copy-paste it from my terminal, but to make things easier for you, you can set-up your own notebook password.
Closing all connections
To close connections, I usually stop my notebook from remote via CTRL + C then
Y, and kill the process on YYYY via:
localuser@localhost: sudo netstat -lpn |grep :YYYY

# This will show the process ID (PID), e.g. ABCDEF of the one running in YYYY,
# you can kill it by simply typing

localuser@localhost: kill ABCDEF
Making life easy
Because I often perform these commands in my daily work, I simply created
some functions where I only need to supply the port during connection. In my
configuration file (this can be your .bashrc), I have the following
commands:
Helper function to fire-up a Jupyter notebook in remote
function jpt(){
    # Fires-up a Jupyter notebook by supplying a specific port
    jupyter notebook --no-browser --port=$1
}
And thus I only need to write:
remoteuser@remotehost: jpt 8889
Helper function to listen to a port
function jptt(){
    # Forwards port $1 into port $2 and listens to it
    ssh -N -f -L localhost:$2:localhost:$1 remoteuser@remotehost
}
And so:
localuser@localhost: jptt 8889 8888
For me, this reads as “jupyter tunnel”, and the whole command is like an action “tunnel 8889 (the port from my remote) to 8888 (port from my local machine)”.
Using a config file
Update: May 31, 2021 Thanks to @a-berg, here’s
a more hassle-free way of tunneling notebooks. This one involves updating your
SSH config file. You can usually find it in $HOME/.ssh/config.
Open your config file, and add the following section
Host notebooks
    HostName host
    User myuser
    LocalForward YYYY localhost:XXXX
where:
notebooks: an arbitrary “label” for the connection you’ll makeHostName: the username of the host that will connectUser: the identity of the user that will connectLocalForward: specifies a connection that will forward the traffic to the remote machine
Given that, it’s now possible for us to connect as myuser@host in our remote
server by just typing this command:
localuser@localhost: ssh -Nf notebooks
As @a-berg mentions, you can even add an
IdentityFile to properly secure your connection!
Awesome! To learn more about SSH configuration files, I’ll direct you to this
wonderful tutorial from DigitalOcean.
And that’s basically it! The Jupyter notebook is really a wonderful tool for literal programming where you can intersperse text and code in one document. In my use-case, I don’t have the Tensorflow GPU library in my local machine so I need to run notebooks on-top of our laboratory’s server. This enabled me to decrease development time, and helped me perform fast analyses of my models.
Hi there, I’ve been using notebooks for a long time now and it may be good to give a review of the notebook ecosystem for 2020. You can read it in this link.
If you like this, you’ll enjoy:
- How to manage Python environments
- How to improve software engineering skills as a researcher
- How to use Jupyter Notebooks in 2020 (Part 1: the data science landscape)
Changelog
- 05-31-2021: Add section for using SSH config files (thanks to @a-berg!)
- 03-06-2020: Add link for Jupyter Notebooks review
- 09-29-2018: Update figure using Tikz for consistency
- 09-11-2018: Add diagram to Jupyter notebook tutorial