
spaCy Internals: Configuration and project system
This was my initial draft. If you wish to see the final version of this article. Head over to the Explosion website. The figures are cleaner and the > writing is more polished.
Back then, when I want to train my own NER model using spaCy, I’d write my own training loop. Something like this:
with nlp.disable_pipes(*other_pipes):
  for i in range(epochs):
    random.shuffle(train_set)
    batches = minibatch(training_data, size=64)
    for batch in batches:
        text, annotations = zip(*batch)
        nlp.update(texts, annotations, drop=0.5, losses=losses)
It was pretty good until I started handling multiple NLP projects: I would rewrite the same code over and over again, teams would develop competing standards of what goes into the loop, and third-party integration would become nontrivial—it can get messy in no time!
Also, the snippet above is still incomplete—a full solution would be much more involved. To complete my training loop, I have to write code to set my learning rate, customize my batching strategy, initialize my weights, and so on!
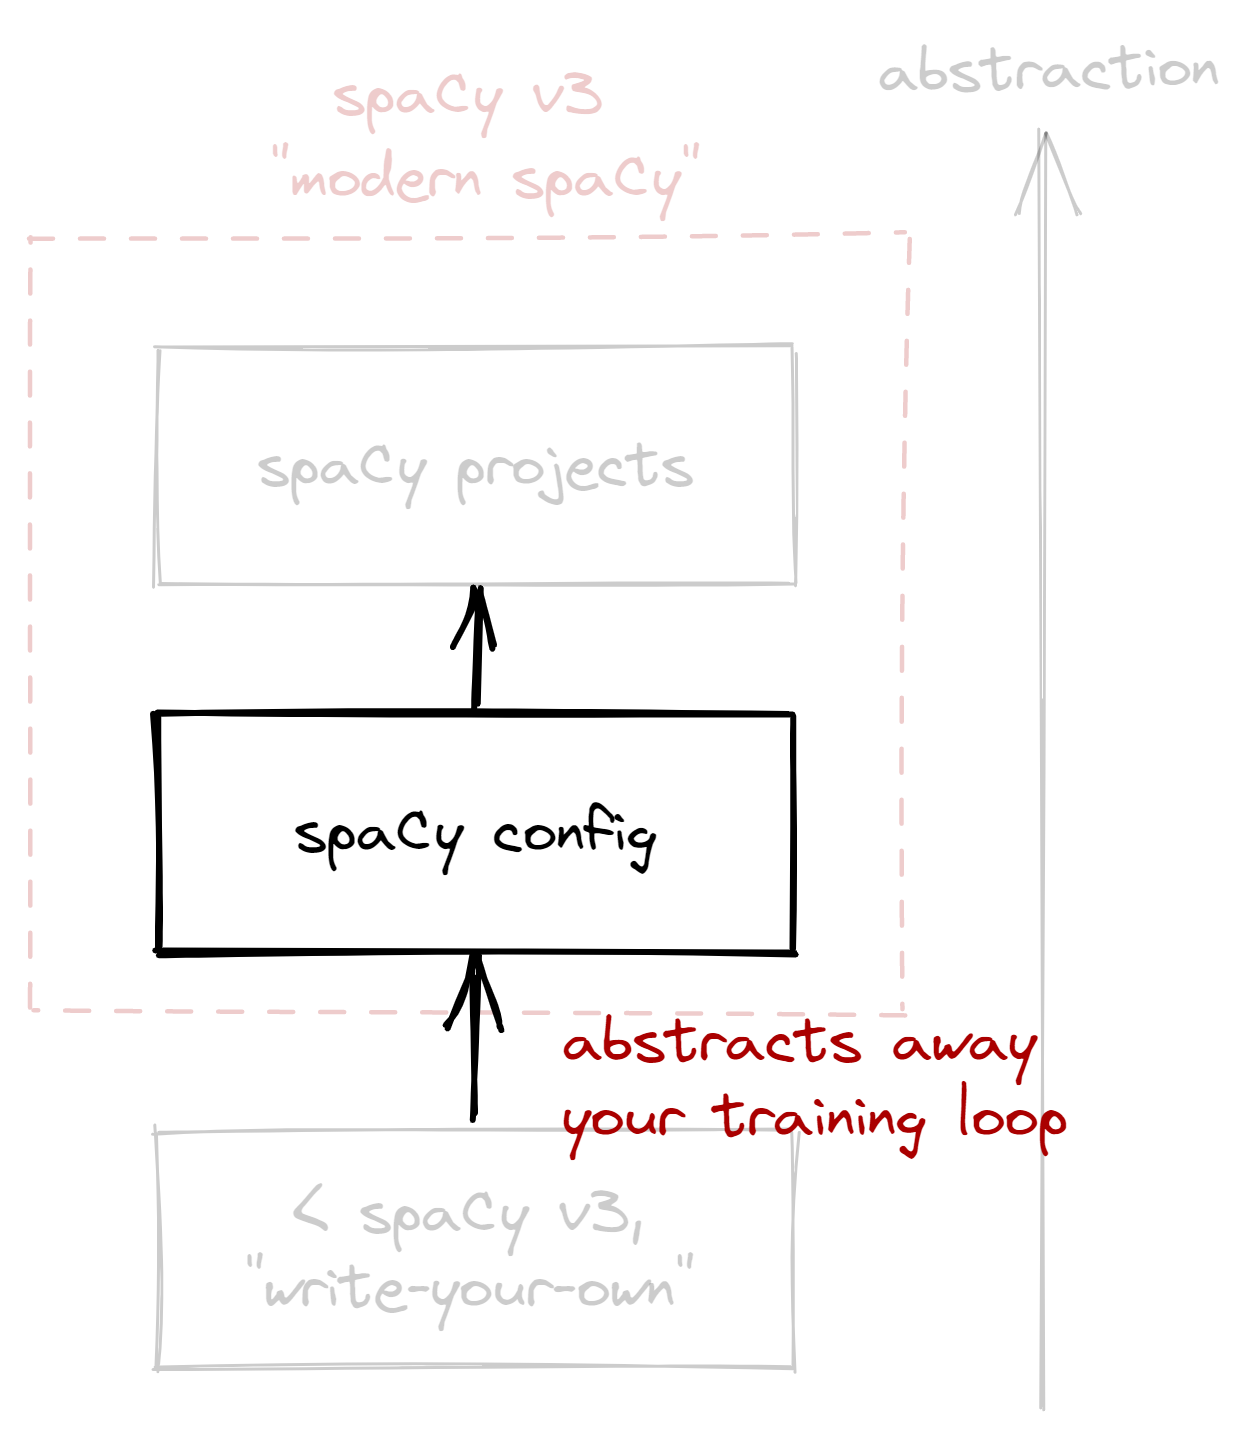
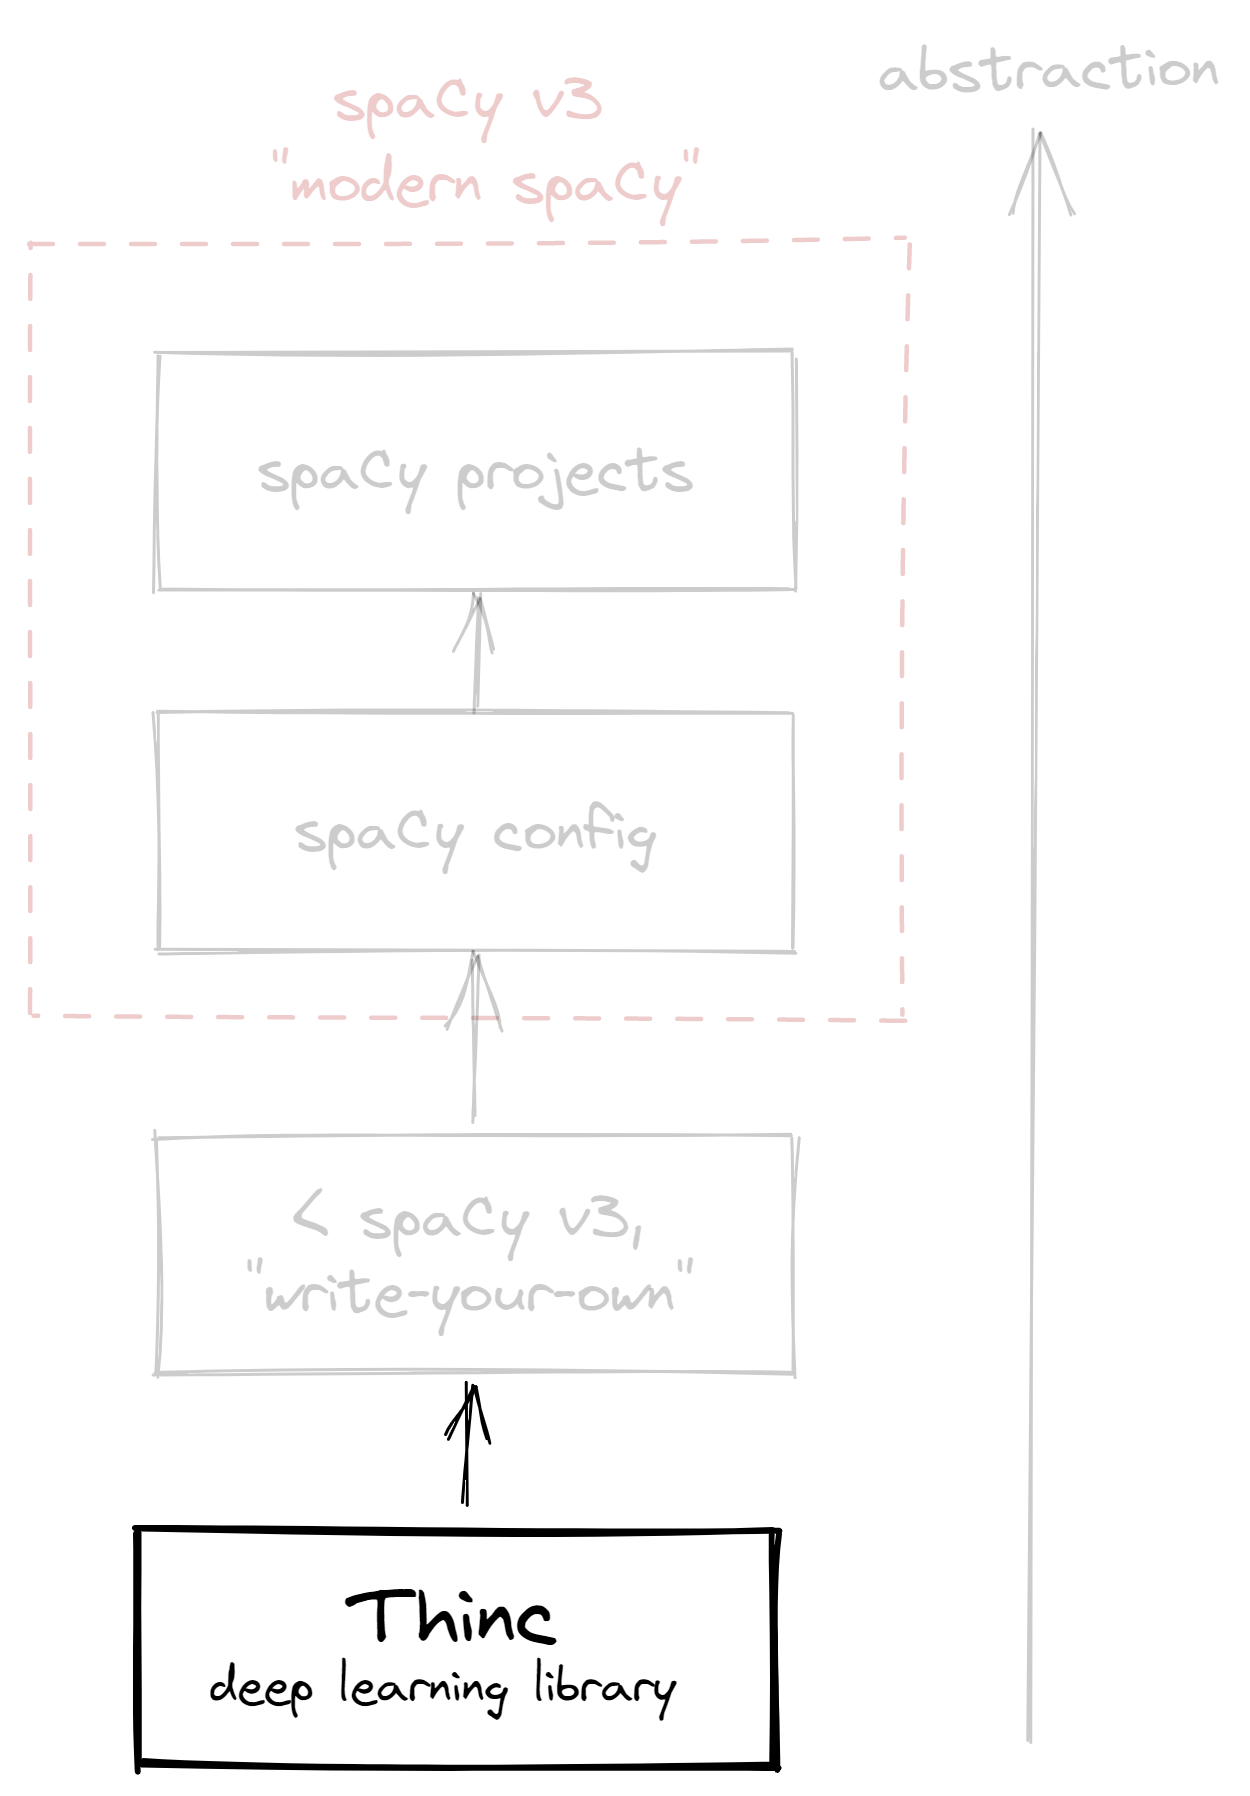
This year, spaCy released v3 and introduced a more convenient system for NLP projects. If there’s one key takeaway from this blogpost, then it’s that you don’t have to write your own training loop anymore. With that said, here’s how I think about the “spaCy stack” now:
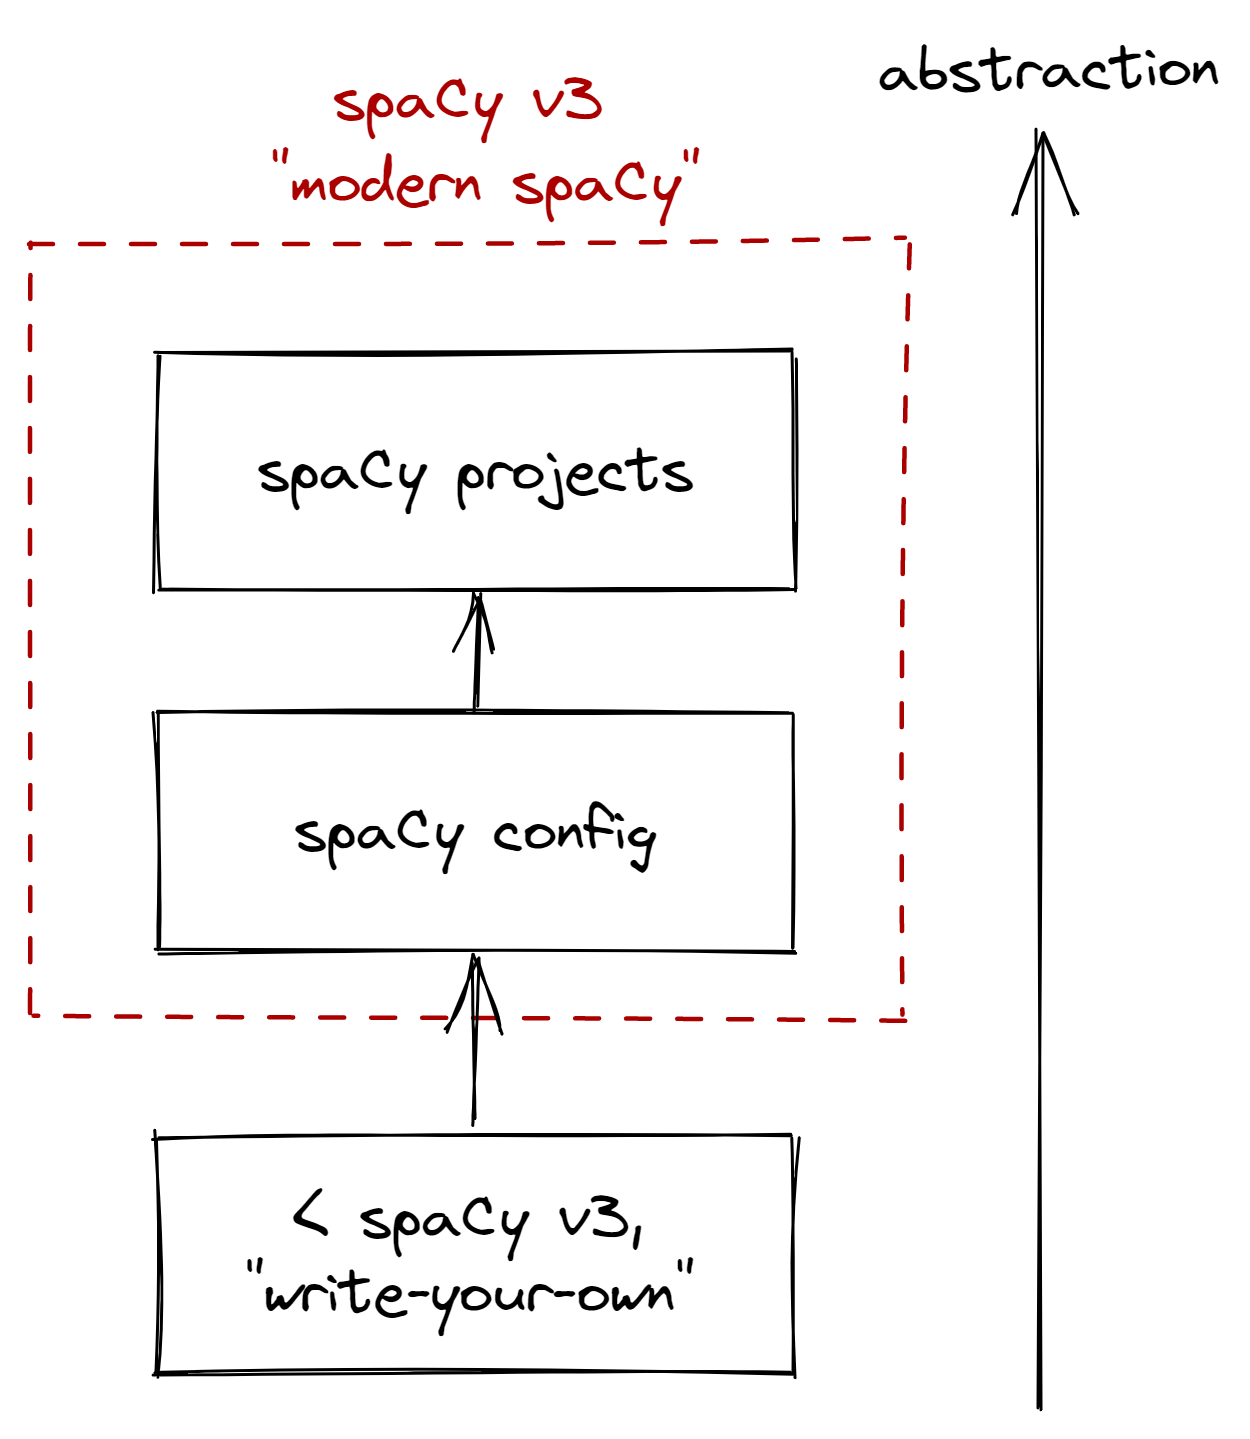
In this blogpost, we’ll go through the stack in increasing levels of abstraction. First, we’ll look into the configuration system, and see how it abstracts our custom-made training loop. Then, we’ll look into spaCy projects, and see how it abstracts our configuration and NLP workflow as a whole. Lastly, I’ll share a few thoughts as a spaCy user and developer.
The spaCy configuration system
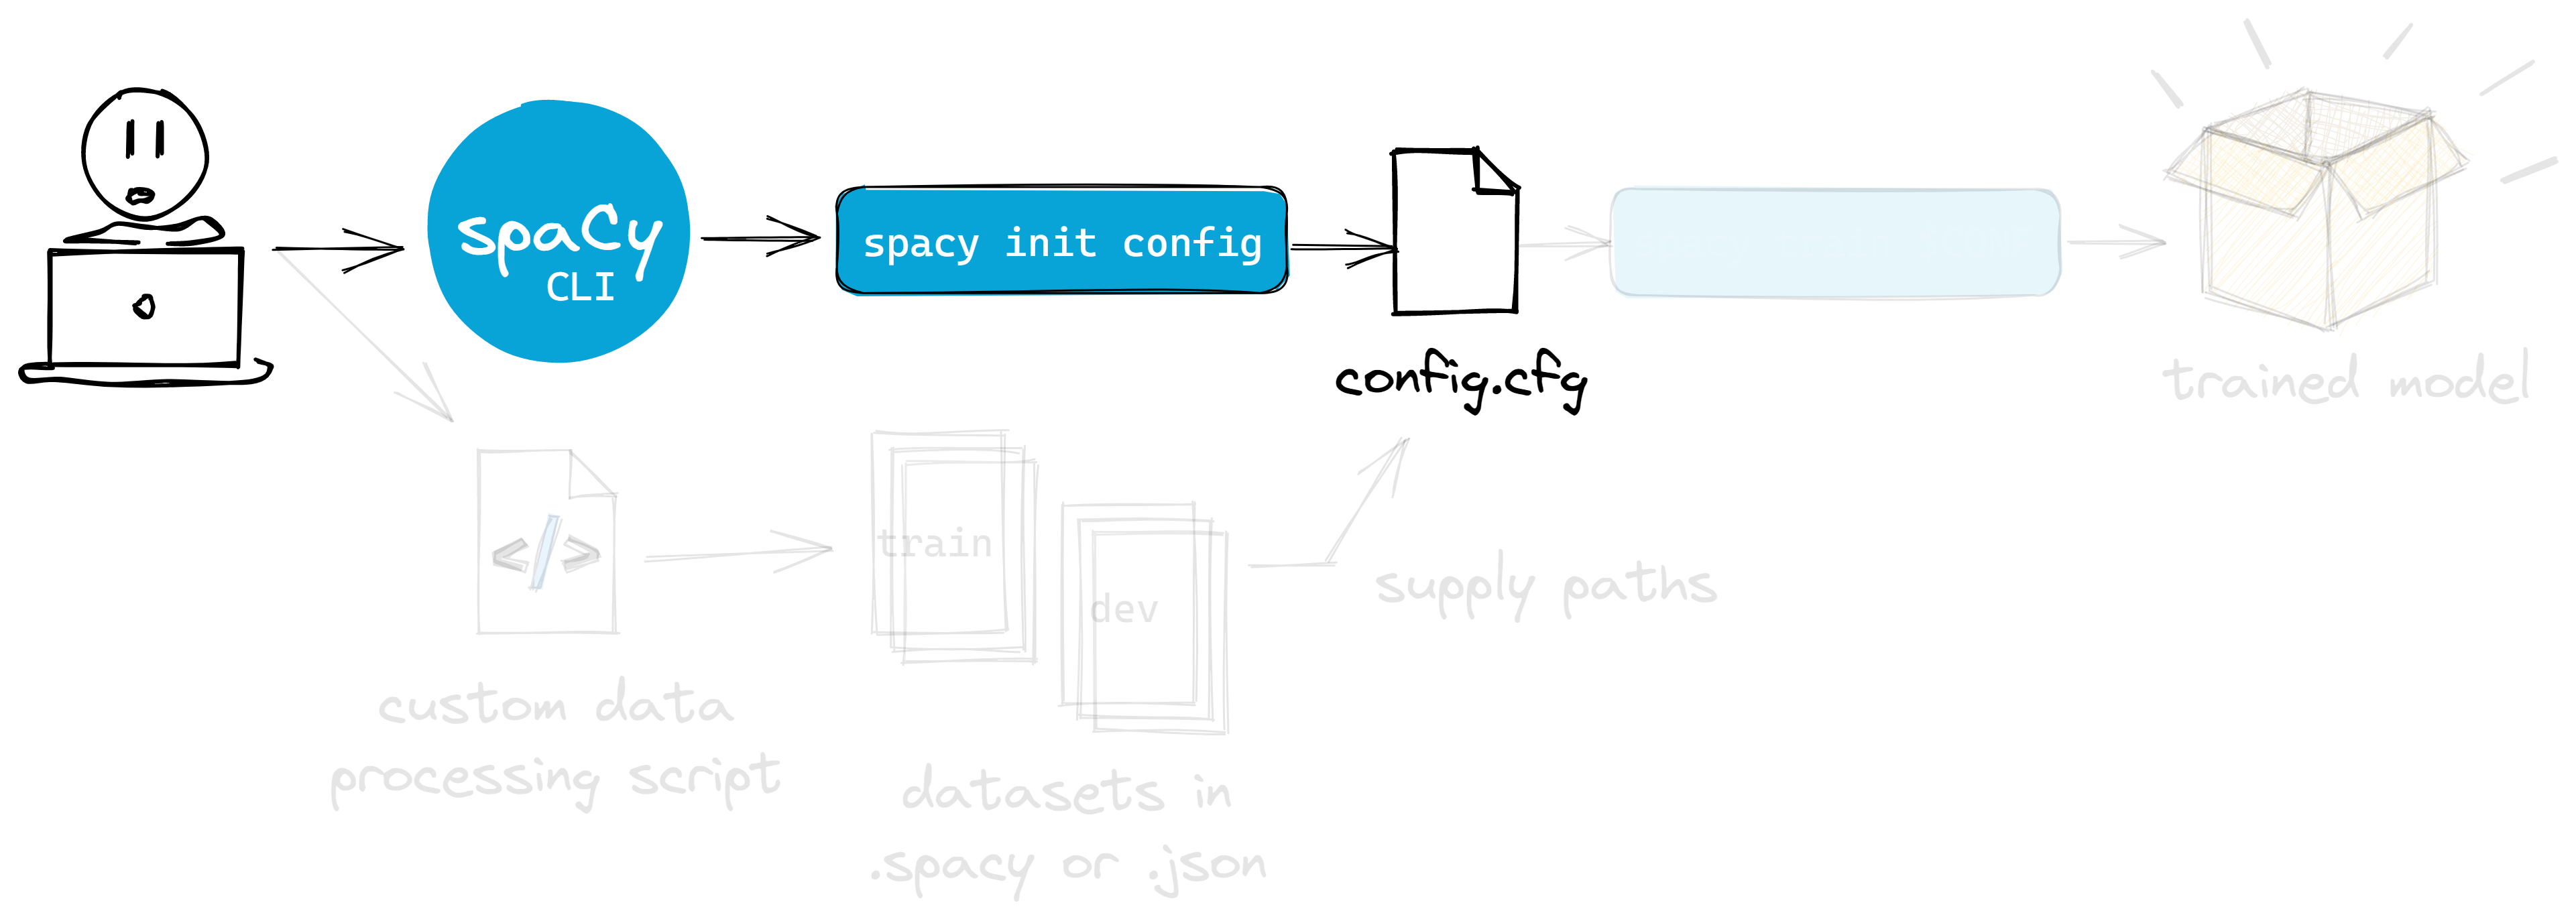
If I were to redo my NER training project again, I’ll start by generating a
config.cfg file:
python -m spacy init config --pipeline=ner config.cfg
Think of config.cfg as our main hub, a complete manifest of our training
procedure. We update it using any text editor, and “run” it through the spaCy
command-line interface (CLI).
I’ll talk about my way of managing them later, but first, let’s continue by
setting-up our train and dev datasets. Note that it’s still null in our
config:
# ... excerpt
[paths]
train = null
dev = null
# ... excerpt
Even if we don’t have to write our training loop, chances are, we still need to
write our data preprocessing step. But if our dataset follows standard formats
like CoNLL-U, then we skip this step and just convert it with the spacy
convert command.
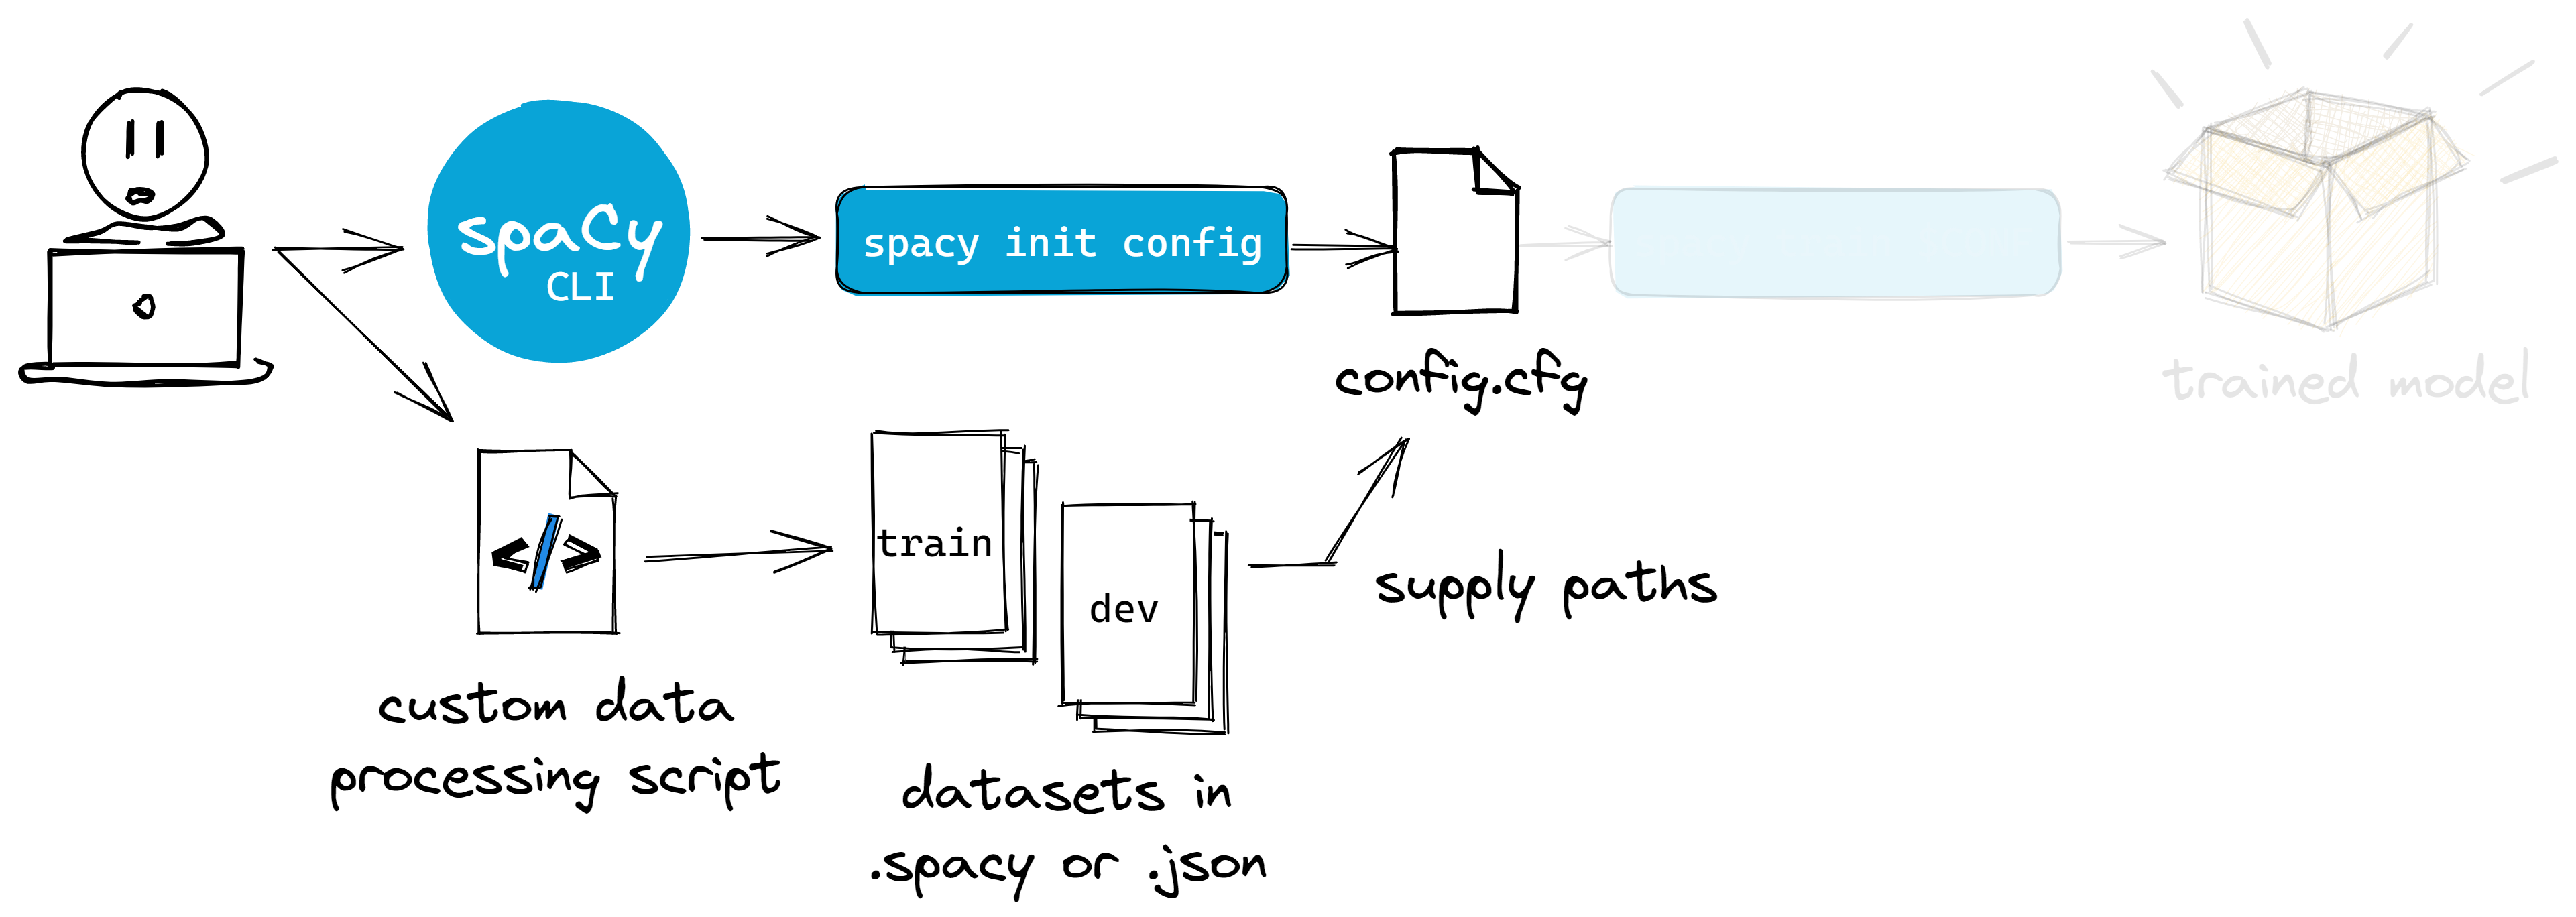
DocBin, then into the disk.Even if our preprocessing step is tightly-coupled to our dataset, we’d want it
to be saved as a DocBin object (with a .spacy
extension). Due to spaCy’s efficient
serialization, saving our dataset
into this format gives us the benefit of working on smaller files. Below is a
sample recipe adapted from
explosion/projects:
def convert(lang: str, input_path: Path, output_path: Path):
    """Convert a pair of text annotations into DocBin then save"""
    nlp = spacy.blank(lang)
    doc_bin = DocBin()
    for text, annot in srsly.read_json(input_path):
        doc = nlp.make_doc(text)
        ents = []
        for start, end, label in annot["entities"]:
            span = doc.char_span(start, end, label=label)
            if span is None:
                msg = "Skipping"
            else:
                ents.append(span)
        doc.ents = ents
        doc_bin.add(doc)
    doc_bin.to_disk(output_path)
We have now streamlined our process. Previously with spaCy v2, I’d have to save
my training data into an intermediary
GoldParse object. With v3, I only have to
think about my dataset’s Doc representation,
nothing more.
Once we’re done, we should have a .spacy file for both our
training and evaluation datasets. We can go ahead and provide the paths in our
config.cfg file:
[paths]
train = "path/to/train.spacy"
dev = "path/to/dev.spacy"
# ... rest of the configuration
Just to be sure, I’d also run debug
commands before training. My favorite is debug data: it informs me of invalid
annotations and imbalanced labels. Once everything checks out, training my NER
model becomes as easy as running:
python -m spacy debug data config.cfg
Once everything checks out, training my NER model becomes as easy as running:
python -m spacy train config.cfg --output ./output
After training, the ./output folder will contain our best model, which I can
now use just like any other spaCy model. I could either pass the path to
spacy.load, or get some metrics
by using the spacy evaluate command.
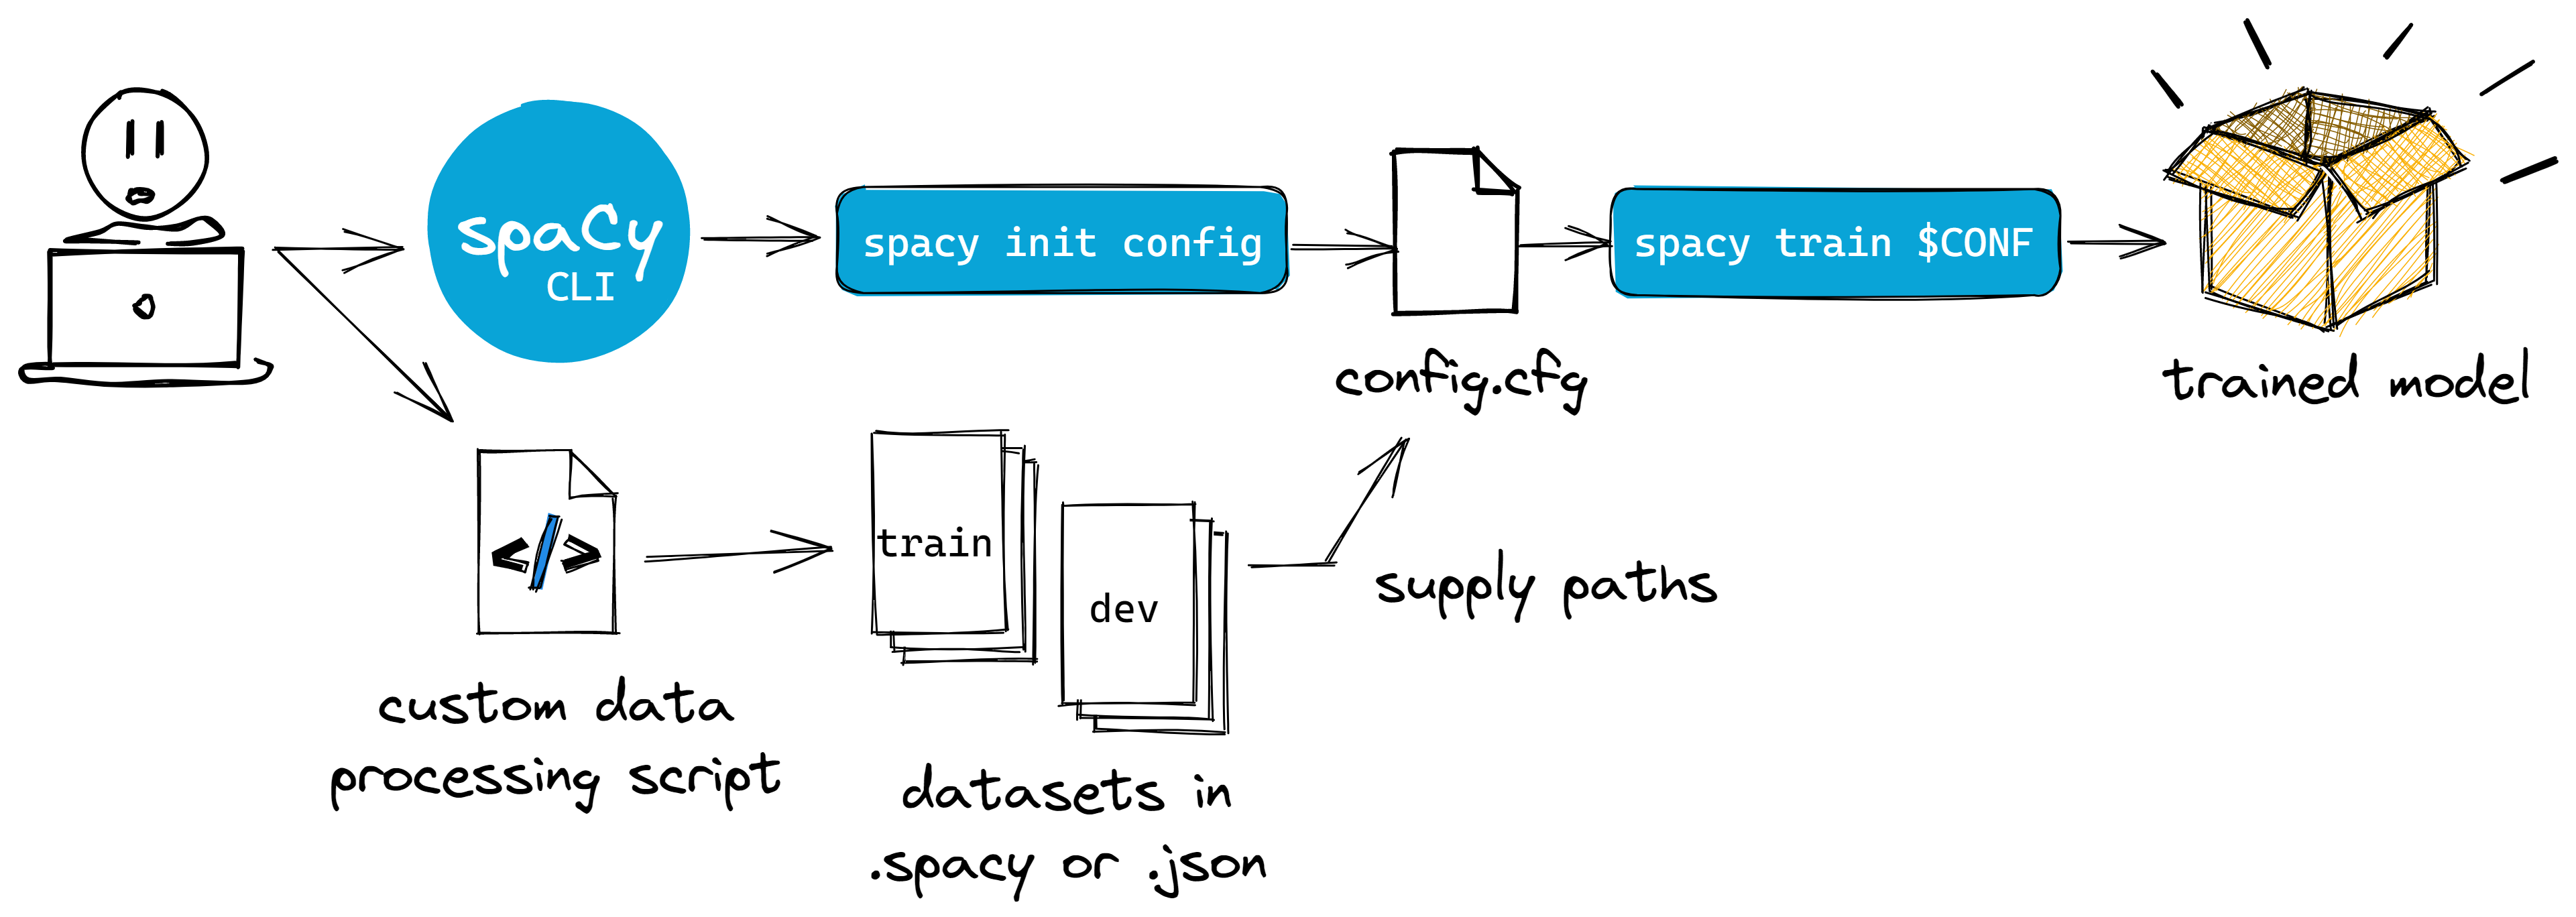
—and that’s it! Again, we don’t need to write our training loop anymore. In
fact, you even remove the need to write auxiliary scripts for training—
say, a custom CLI using click or
typer. It all boils down to your config.cfg
file and (optional) data preparation script. The spaCy CLI handles
everything.
However, if you’re just like me who feels secure knowing which code runs when a
command is executed, then feel free to check the table below. It lists down, in
decreasing levels of abstraction, the code being run whenever spacy train is
executed.
| Method | What it does |
|---|---|
train |
The interface called when you run spacy train. Loads training configuration and validates inputs. |
train_while_improving |
The usual training loop that iterates on a batch of training data. Each iteration updates a language pipeline. |
Language.update |
The actual update step of the language pipeline. Takes an optimizer and a batch of samples. |
How to manage your config
The config file presents us with all the options we need to successfully train our model. Sure, it looks overwhelming at first, but the upside is that we get all the relevant information in one place. With that, it becomes easier to reproduce experiments, and trace differences across our models.
However, if you prefer looking at a file with a minimal set of options, then you
can create a base_config.cfg with the partial list you need, and fill it
with the fill-config subcommand:

# base_config.cfg contains a partial list of options
[paths]
train = "path/to/train.spacy"
dev = "path/to/dev.spacy"

[nlp]
lang = "en"
pipeline = []
batch_size = 5000
When running spacy train, you should still pass the config with the full list
of options, i.e config.cfg. So even if my base_config.cfg only contains
settings for batch_size (because maybe that’s what I only care about for now)
the resulting config.cfg will still include all parameters and defaults to
successfully train our model.
Personally, I still prefer to work with the full configuration itself. I don’t
have to maintain two files, nor remember to run fill-config everytime I
change one. Just be mindful during major version updates: the fill-config
command may differ and introduce variability in your setup, rendering it
irreproducible. As a best practice, pin your dependencies to mitigate this
scenario.
How to understand your config
Having all parameters spelled out means that there are no hidden defaults to secretly mess up our training. So whenever I come across an unfamiliar setting, what I do is follow the breadcrumbs in the spaCy documentation.
Whenever I come across an unfamiliar parameter (in my configuration file), what I usually do is follow the breadcrumbs in the spaCy documentation.
Take a look at this example. Let’s say I want to know more about the
compounding.v1 schedule in [training.batcher.size]:
# ... excerpt
[training]
seed = 42
gpu_allocator = "pytorch"
dropout = 0.1
accumulate_gradient = 1
patience = 1600
max_epochs = 0
max_steps = 20000

[training.batcher]
@batchers = "spacy.batch_by_words.v1"
discard_oversize = false
tolerance = 0.2
get_length = null

[training.batcher.size]
@schedules = "compounding.v1"
start = 100
stop = 1000
compound = 1.001
t = 0.0
# ... excerpt
The first thing I’d do is check the section it belongs to; in our case it’s
[training]. Then, I’ll head over to the
"training" section of
spaCy’s data format documentation. There,
we can view all available settings, their expected types, and what they do:
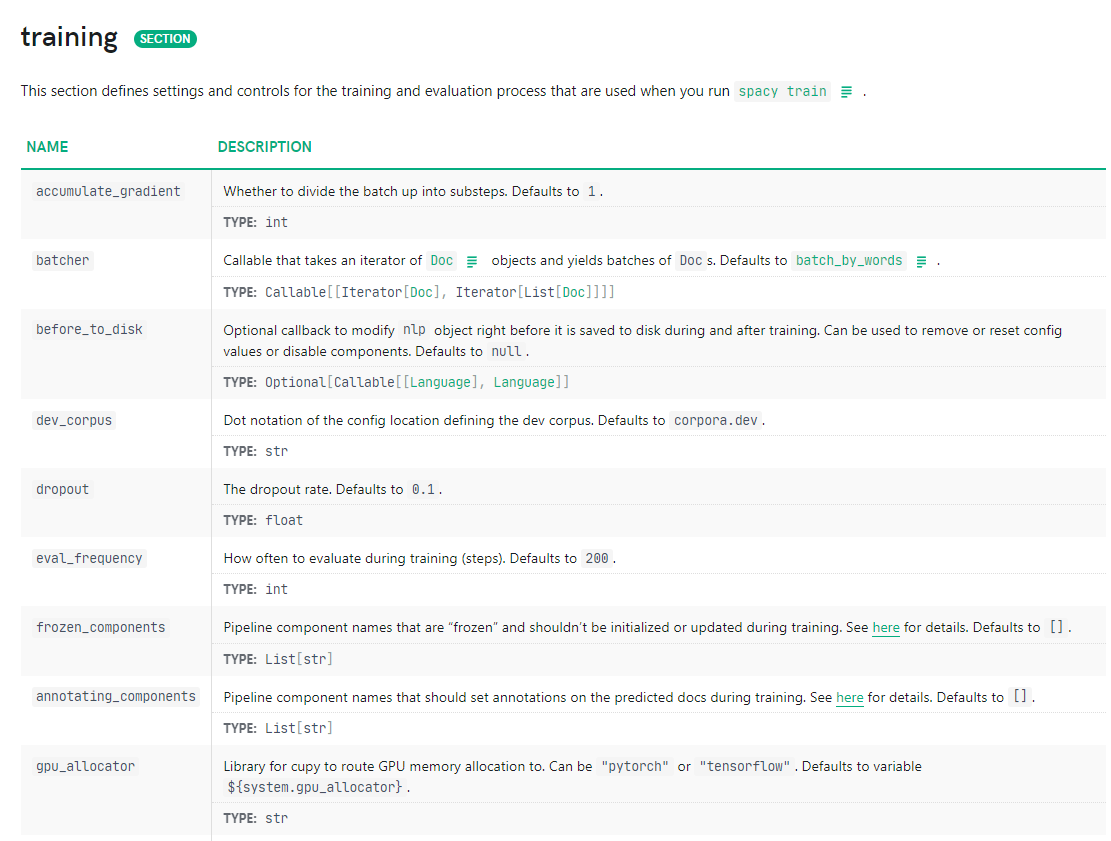
batcher is a function (a Callable).From our config, these settings may be located either (1) in the [training]
section itself or (2) in its own subsection. The latter just means that it can
still be configured further, especially when that parameter takes a function or
a dictionary.
For example, if we zoom into the batcher option, we’ll notice that it
requires a function (or
Callable) as
its input. Thus, we assign it into its own subsection. There, we specify the
exact function to use for batching— spacy.batch_by_words.v1.

batcher parameter for training can still be configured further, so it earns its own subsection.Now, we can go deeper into this batching method. We can find the full spec of
the batch_by_words method by looking at spaCy’s top-level API
documentation:
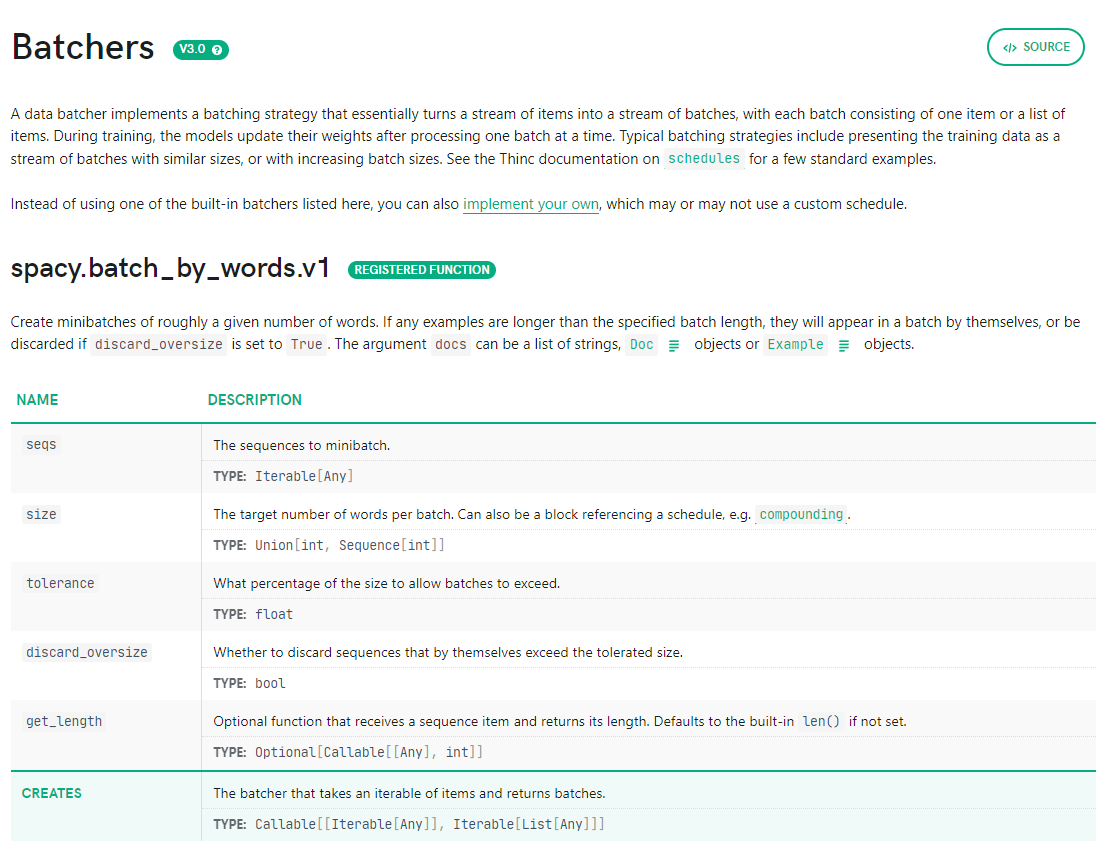
Notice that the same pattern repeats: discard_oversize and tolerance can’t
be configured further, so we just snug them under the same subsection. On the
other hand, size can refer to a scheduler function, so it has its own
subsection:
# ... excerpt
[training.batcher.size]
@schedules = "compounding.v1"
start = 100
stop = 1000
compound = 1.001
t = 0.0
# ... excerpt
batcher, we can configure the size further.If we still want to learn more about the compounding.v1 schedule, then we can
check the Thinc
documentation.
Thinc powers spaCy, and sits a layer below it:
:
Notice that the way we traversed the configuration is from top to bottom: we
started with the main components of the training workflow (training), then
peeled layers of abstraction until we reach more specific settings
(compounding.v1). By doing so, we have also traversed the spaCy stack!
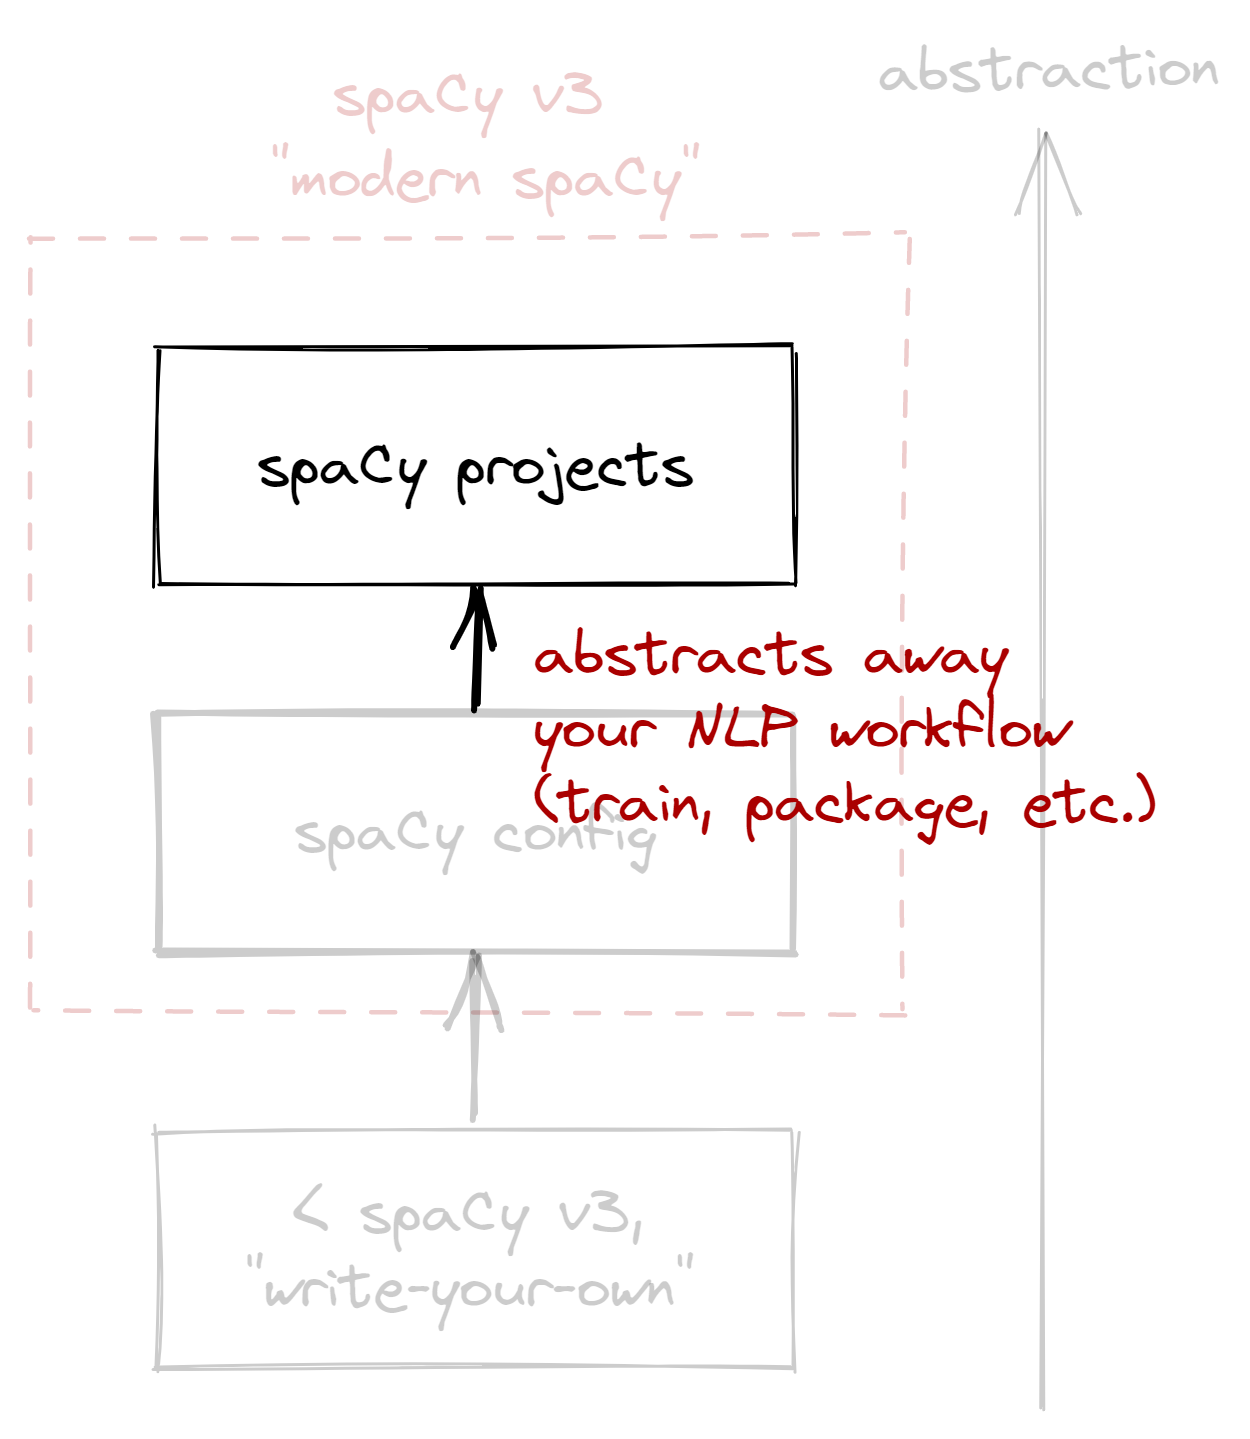
In the next section, we’ll move up the stack to spaCy projects. If the config file governs your training loop, then spaCy projects govern your entire machine learning lifecycle.
The spaCy project system
An abstraction above spaCy’s configuration system is spaCy projects: if the config system is just about training models, then spaCy projects is about the larger machine learning workflow (i.e., training, packaging, productionizing, etc.).
If the config system is just about training models, then spaCy projects is about the larger machine learning workflow.
I lied a bit earlier: if I were to start an evergreen NLP project, then I’ll start by cloning one of the prebuilt projects for my use-case. For my NER example, I’d use the NER demo pipeline:
python -m spacy project clone pipelines/ner_demo
From here on in, everything is up to us. Our main point of interaction is the
project.yml file, where we define how our project will look like. Its
structure is akin to a Makefile, enabling us to define steps or workflows
beyond model training:
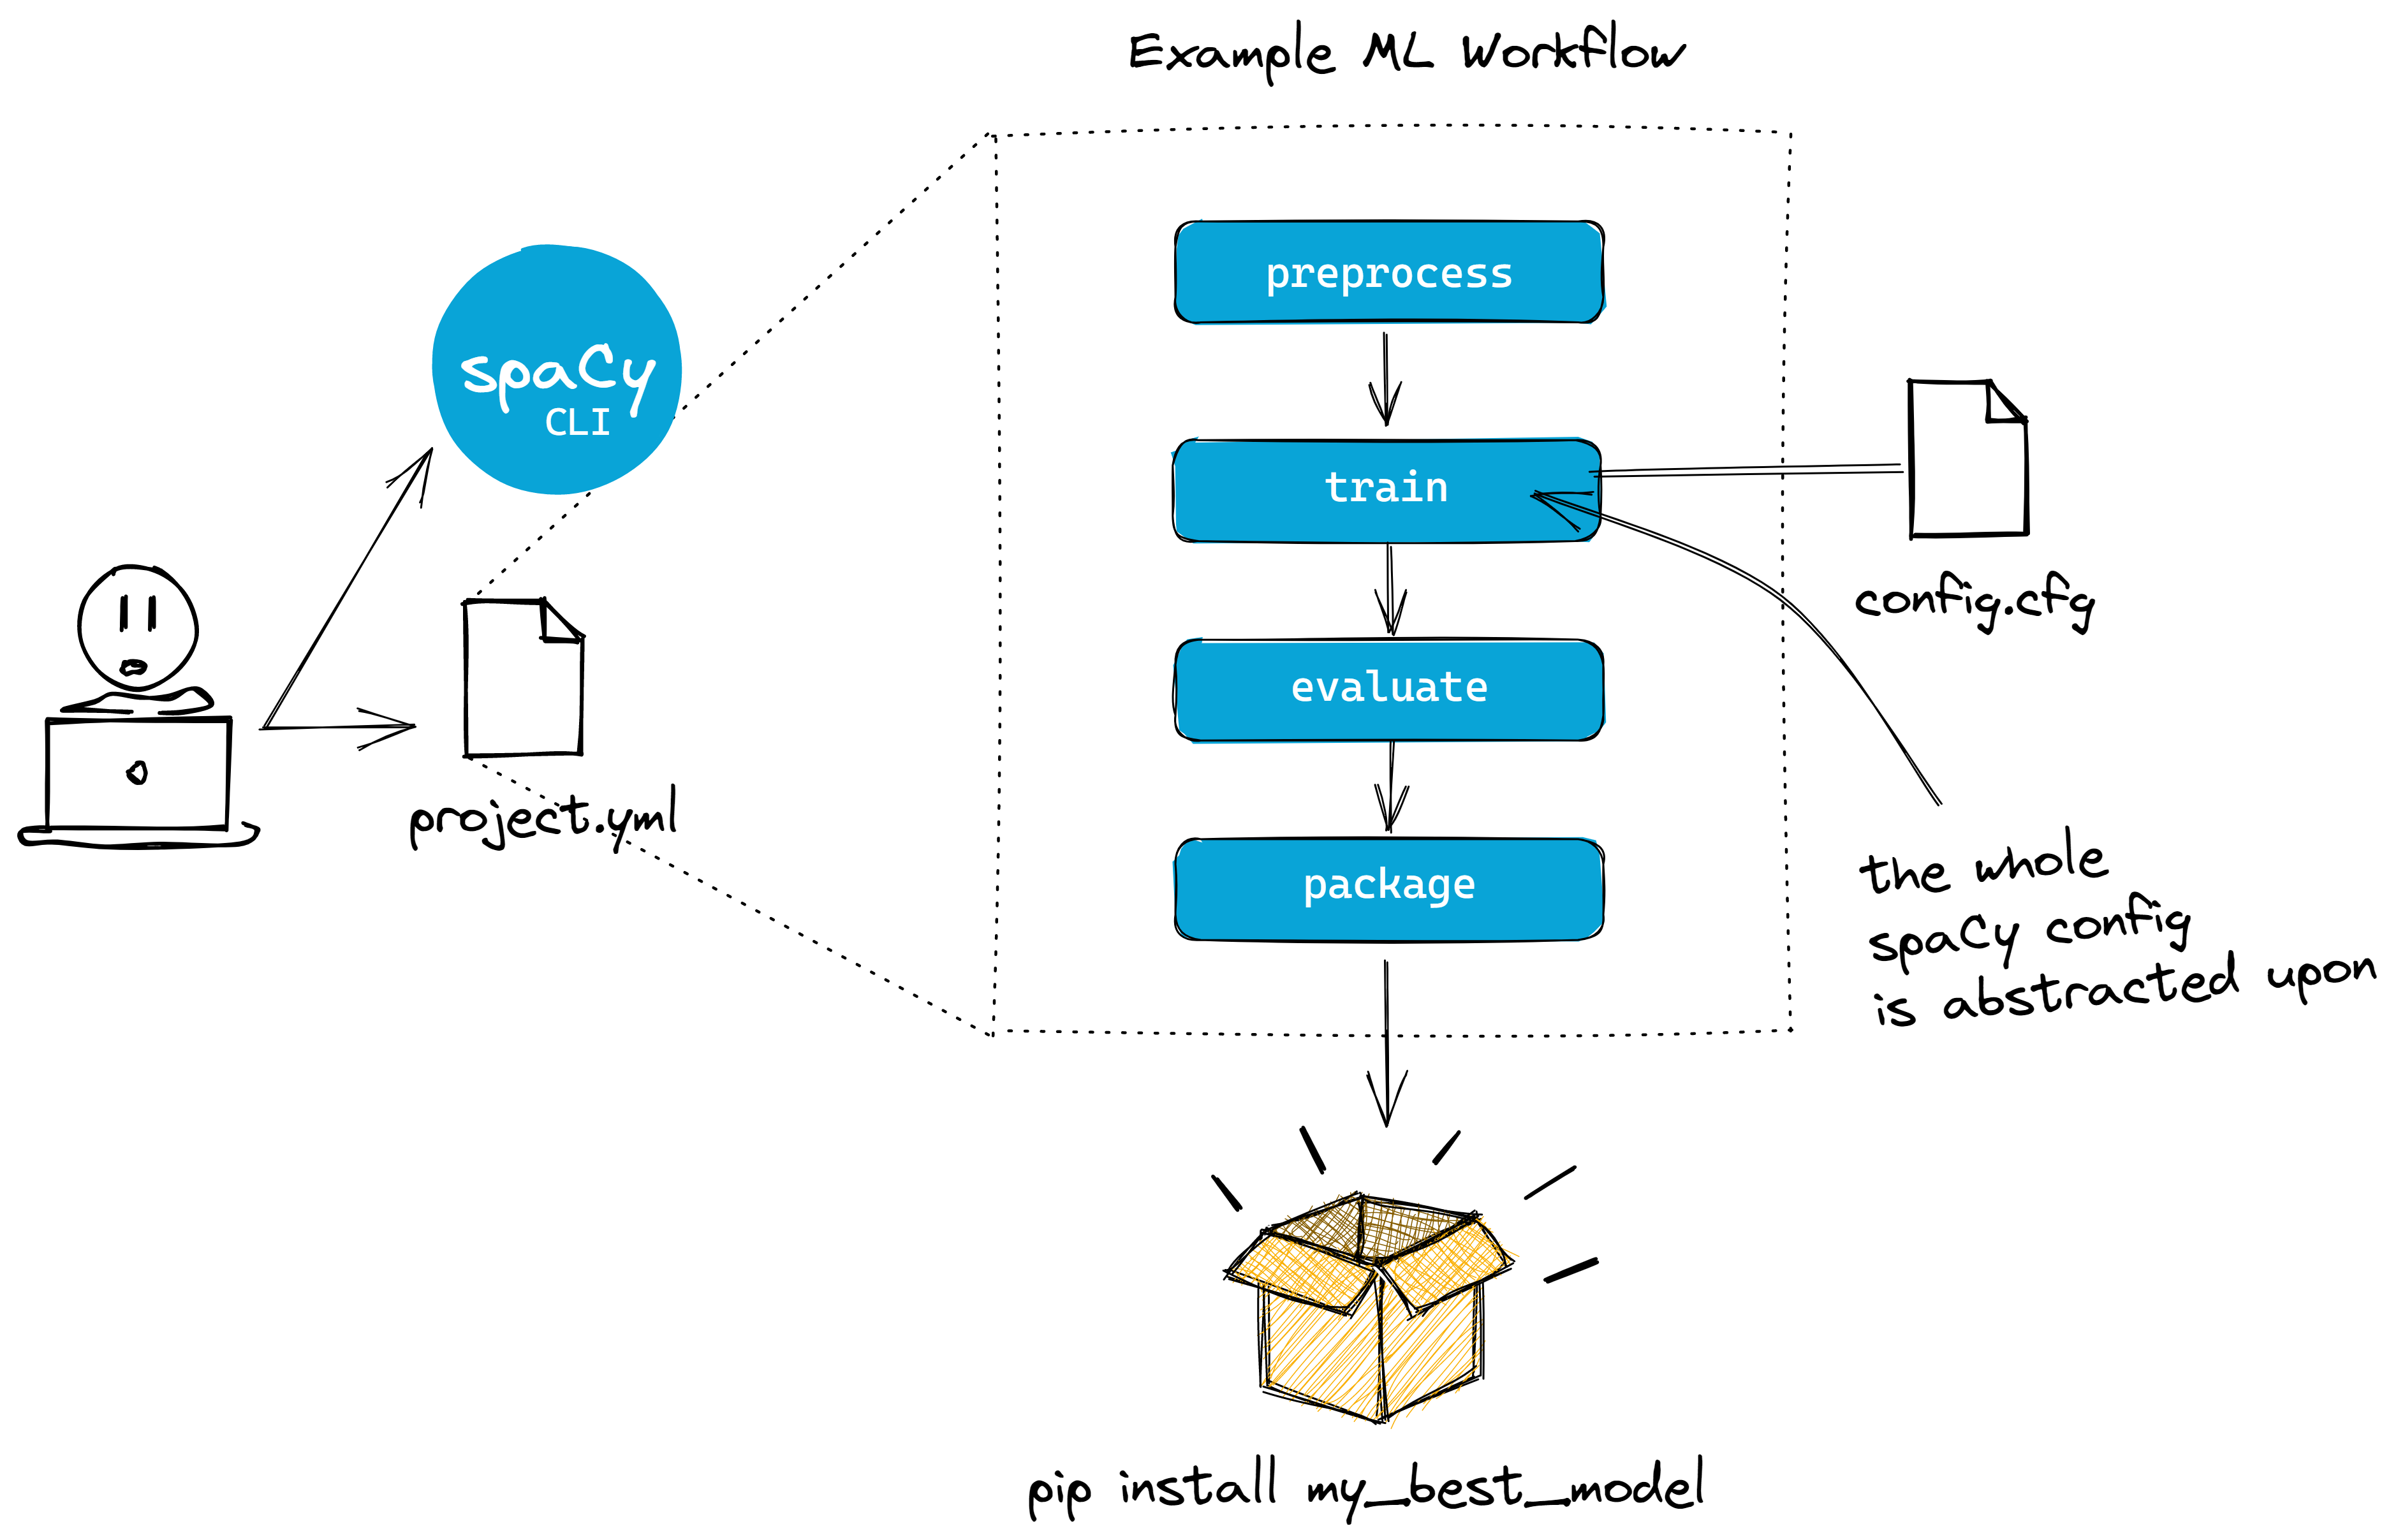
project.yml file to manage our whole machine learning workflow. We can then use the spacy project run <STEP> to execute steps or workflows.If I am working on a typical NLP use-case, I’d first check if there’s an
equivalent pipeline in
explosion/projects, and clone that.
NER and text-categorization already have pre-made templates that are
well-optimized for said task. The remaining thing to do is adapt my dataset
into the DocBin format.
Whenever I define workflows, I usually start by outlining what I want to do in
the commands section before jumping right into the code. For example, in text
categorization, I may just have something like this:
# ... excerpt
commands:
- name: "preprocess"
  help: "Serialize raw inputs to spaCy formats"
  script:
  - "python scripts/preprocess.py assets/train.txt corpus/train.spacy"
  - "python scripts/preprocess.py assets/dev.txt corpus/dev.spacy"

- name: "train"
  help: "Train the model"
  script:
  - "python -m spacy train configs/config.cfg"

- name: "evaluate"
  help: "Evaluate the best model"
  script:
  - "python -m spacy evaluate training/model-best corpus/test.spacy"
# ... excerpt
Under the script, I usually write “dummy commands” that aren’t implemented yet;
it’s like scaffolding your project before building it. By planning how my
scripts will run beforehand, it’s as if I’m writing the human-to-computer API
first.
The project.yml file also allows us to explicitly define expected
inputs and outputs for each step using the deps and outputs keys. For
example, the evaluate command as shown below will require that a test set,
corpus/test.spacy, exists before running:
# ... excerpt
commands:
- name: "evaluate"
  help: "Evaluate the best model"
  script:
  - "python -m spacy evaluate training/model-best corpus/test.spacy --output metrics/best_model.json"
  deps:
  # the spaCy cli will expect that corpus/test.spacy exists
  # before running the command
  - "corpus/test.spacy"
  outputs:
  # the spaCy cli will expect that metrics/best_model.json is produced
  # after running the command
  - "metrics/best_model.json"
# ... excerpt
By doing so, we can easily see our step’s dependencies and command chain. This is one of my favorite features because I often get bitten by missing files or hidden requirements. This also allows me to push and pull artifacts into a remote storage.
The good thing about project.yml is that it supports a top-down approach to
problem solving: I can outline a big-picture view of my project first—
with all its dependencies and outputs— then work my way through the details.
Lastly, it also has some conveniences like automatically generating documentation, and integrations with popular tools.1 By using one of the premade pipelines in spaCy projects, it becomes easier to tap into the larger ML ecosystem.
Final thoughts
As someone who has used spaCy since they learned NLP, it’s awesome to see how convenient and well-integrated it is with other tools! Of course, migrating a project is not easy, especially if a dependency had a major change. There are use-cases where spaCy’s config and project system work best, and I’d like to outline them here:
| Use-case | spaCy version | Suggestion |
|---|---|---|
| Starting a new NLP project | use v3 | Start using v3 and take advantage of the project templates and config system. |
| NLP project in production and using the train config | v3 | Awesome! You can marginally adapt the project system, but of course if it ain’t broke, don’t change it. |
| NLP project in production with custom training loop | v3 | Try using atleast the config system and evaluate the results with your current model as baseline. |
| NLP project in production, but using spaCy v2 | v2 | If possible, migrate to v3 (while being mindful of your model versions). Or seek help from Explosion! |
As usual, standard software engineering practices still apply: always pin your dependencies, ensure your environments are reproducible, and if it ain’t broke, don’t fix it. However, if you are intent on making the jump, be sure to check out the migration guide from the spaCy docs. The old v2 docs are also up so you can reference them from time to time.
Many thanks to Ines, Matt, and Sofie for the feedback and edits!
-
This includes tools like DVC, Weights and Biases, Huggingface, Streamlit, and Ray. ↩